Setup
Hyvor Relay is now installed on your server(s). The next step is to configure your DNS to access Hyvor Relay and ensure optimal email deliverability.
(1) Web Domain
Web domain is where you access the Hyvor Relay Console, Sudo, and API. This is the domain name
of the environment variable WEB_URL you set during installation. Point the web domain to one of your server's IP addresses using an A record.
Arelay.yourdomain.comx.x.x.x (your server IP)If you used https in the WEB_URL, Caddy will automatically obtain
and configure a TLS certificate for your web domain using Let's Encrypt. This might take a few
minutes to complete. Make sure to monitor logs.
Once the DNS changes have propagated, you should see the Hyvor Relay homepage at https://relay.yourdomain.com.
(2) Access Sudo
Next, visit https://relay.yourdomain.com/sudo to access Sudo, the administration panel
of Hyvor Relay. Log in using your OIDC credentials.
In Sudo → Servers, you should see your server(s) listed along with their public IP addresses.
(3) Instance Domain
You configured the instance domain during the installation using the environment variable INSTANCE_DOMAIN. Example: mail.relay.yourdomain.com.
The instance domain and its subdomains are used for many things:
- To populate
PTRrecords for outgoing IP addresses. - For instance DKIM signing (useful for feedback loops).
- For the
MXrecords of the incoming mail server that is responsible for bounces, complaints, and sending via SMTP.
The instance domain is critical for email deliverability. Hyvor Relay is designed to manage the DNS records of the instance domain and its subdomains, making management easier.
To delegate DNS management of the instance domain to Hyvor Relay, set up a NS record pointing to Hyvor Relay's DNS server.
NSmail.relay.yourdomain.com (your instance domain)
ns.relay.yourdomain.comAns.relay.yourdomain.comx.x.x.x (your server IP)This tells the world that the DNS records of mail.relay.yourdomain.com and its
subdomains are managed by ns.relay.yourdomain.com, which points to your Hyvor Relay
instance's IP address.
(4) PTR Records
PTR, also known as reverse DNS, is a DNS record that maps an IP address to a domain name. SMTP
messages contain a EHLO <domain> command, which identifies the sending server (or IP address). In
Hyvor Relay, each sending IP address uses a unique subdomain of the instance domain as the domain name.
You can find the domain name of each IP address in Sudo → Servers section.
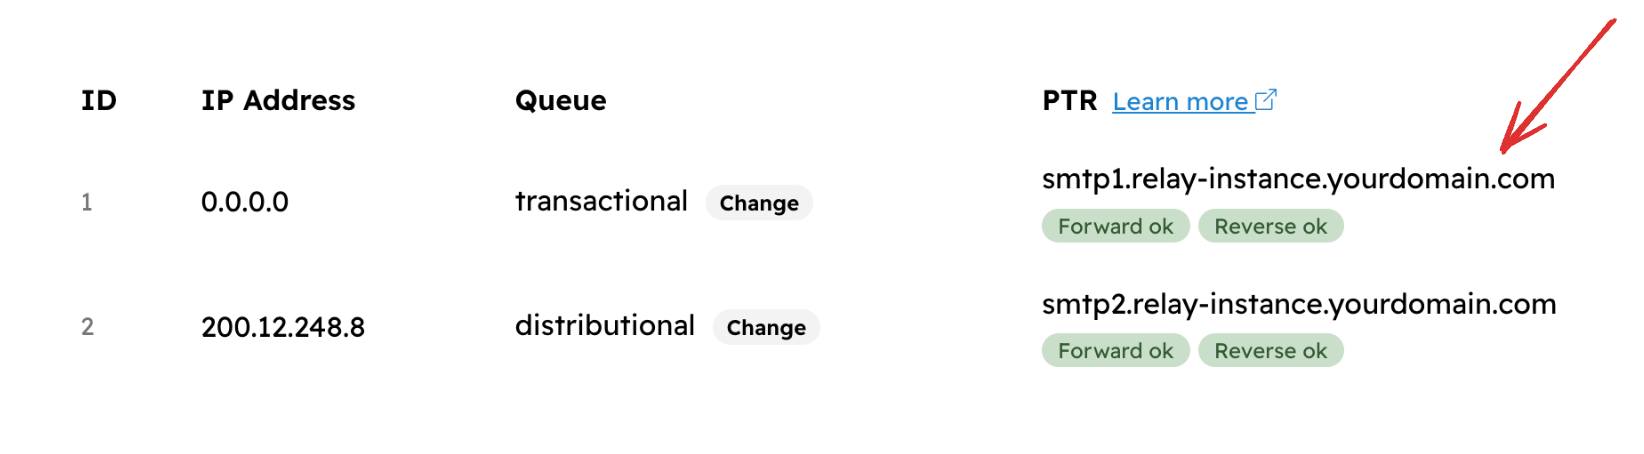
Most email providers require the sending IP address to have a PTR record that points to the domain name ("reverse DNS match") and the domain name to have an A record that points to the IP address ("forward DNS match").
Setting PTR records is something Hyvor Relay's DNS server cannot do for you, as it requires access to the IP address's reverse DNS zone, which is managed by your hosting provider. Consult your hosting provider's documentation or support and set up PTR records for ALL IP addresses as shown in Sudo.
Ex:
8.8.8.8→smtp1.mail.relay.yourdomain.com9.9.9.9→smtp2.mail.relay.yourdomain.com
(5) Health Checks
After the above steps are completed, run a full health check at Sudo → Health → Run Checks to verify that everything is set up correctly. Note that some DNS-related checks might take longer to pass due to DNS caching.
If everything is passing, your Hyvor Relay instance is ready to send emails!
What's Next?
- Visit the Console (
/console), create a project, and send emails. - Set up monitoring to get alerts on issues.
- See Scaling to learn how to scale Hyvor Relay.
System Project
When Hyvor Relay is initialized, a special read-only System Project is
automatically created using the instance domain. It is used for
sending system emails (e.g. notifications). All sudo users are automatically granted read-only
access (project.read, sends.read, domains.read, analytics.read) and this is kept in sync as sudo users are added or removed.
Managing Sudo Users
You can add and remove sudo users from the command line.
- SSH into one of the servers.
cdinto the Hyvor Relay deployment directory.docker compose exec -it relay bashto enter the app container.- Then, use the following commands:
bin/console sudo:list: List all sudo users.bin/console sudo:add <email>: Add a new sudo user by email.bin/console sudo:remove <id>: Remove a sudo user by ID.